Friday, July 25, 2014

The Big E Wall-Hanging


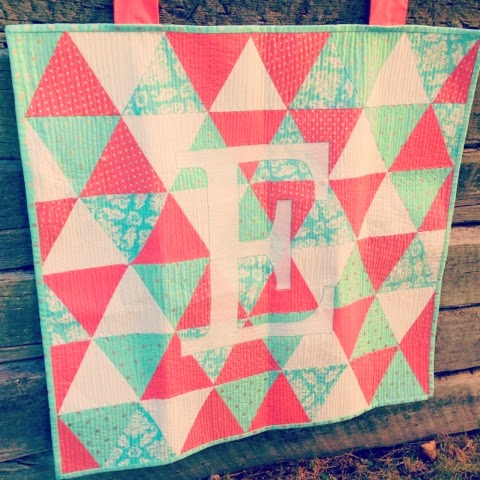
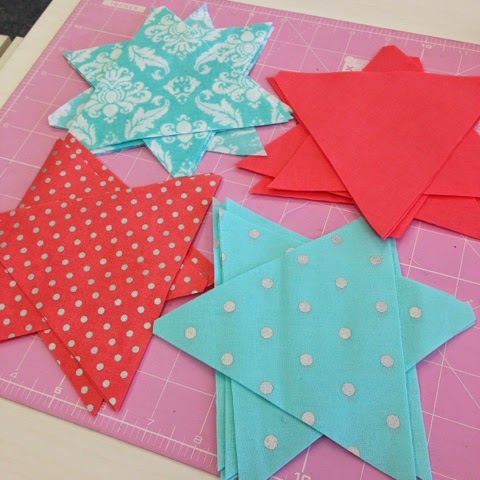
I had some triangles left over from the baby quilt, so I decided to make a wall-hanging for the nursery for Baby Everly, my best friend Jolene's first baby. 


With no pattern I just started sewing the triangles together. To personalize it more, I decided to draw a big monogram for Baby Everly. I adhered the monogram with Heat n Bond and then appliqued using my blanket stitch. I used my Handi Quilter and did a simply back and forth free motion stitch in each row of the triangles. Is it quilted to death? Probably, but I love the look.    

The "E" needed an outline of some sort as it blended in with the white background, so I took a crochet cord and couched it around the E with a zig-zag stitch and my cording/embroidery presser foot (#6 on Bernina)


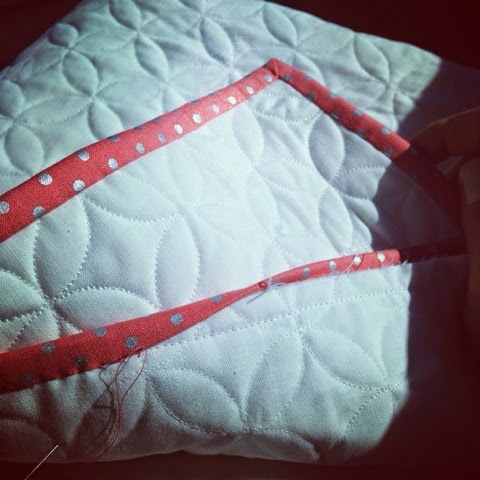
I stitched the binding to the front with my machine and then finished it on the back by hand. (Have any of my long-hair friends accidently sewn over their hair before? Or am I the only one?)

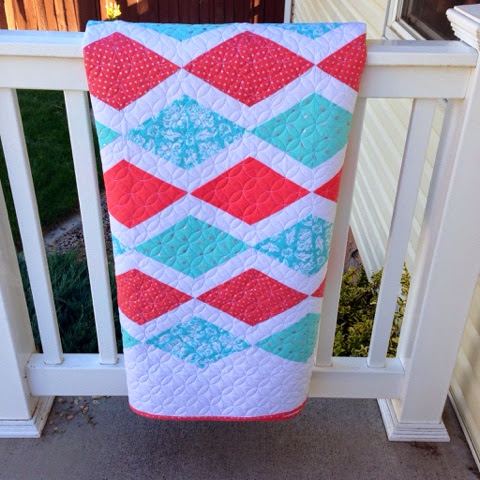
I think it turned out great, it's fun to use up scraps for a personalized project for a special little girl coming into this world very soon. 


Wednesday, July 16, 2014

Gracie's Herringbone Baby Quilt


When thinking of my friend Megan, I can choose a variety of amazing memories that we have made together. We've traveled and ate our way around various cities and ballparks, invented the very popular "pre-dinner" (where we stop for tacos before the actual dinner) and regularly discuss our love for baseball, Liz Lemon, Idaho and Netflix. She's supportive of my work, always offers her encouragement and never gives up on me when life gets busy.

After getting married last summer to her love Obi, I knew a baby would join their New Jersey family of Paprika, their puppy and Beula, the only cat I've ever cared for.


We are both obsessive Pinterest pinners, so when she sent me this pin from Hyacinth Quilt Designs,
"Keep this in mind for a baby quilt"
I had to laugh because I had already pinned the same quilt. 

After the gender reveal, Megan finalized her colors for the nursery. She was having a baby girl, and Gracie would be her name. Bright pinks, oranges, yellows and grays would enhance her classy Dr. Seuss theme.Megan has a great eye for detail (she's an amazingly talented graphic designer and photographer) and it's been exciting to be a part of her nursery design.   


With gray and white as the neutrals in the quilt, the colored rows would really pop! I choose fun, bold prints from the Lillified line from Benartex.

I used my standard rotary ruler to cut the material at a 4 degree angle. I sewed white cotton strips between each color and then repeated the process over and over again. 


After finishing the top, I loaded the quilt onto my Handi Quilter and used the channel lock to achieve the "matchstick" quilting effect. There wasn't a pattern per say, I used mostly white thread and then incorporated the colors into the gray area. I wanted to bring the color all over the quilt and break up the gray more. It made it feel more whimsical, but still sharp, like  Dr. Seuss. 


The next step was to create a custom label for baby Gracie's quilt in my V7 Bernina software, and then using my Bernina 830, I embroidered it. 

I hand stitched the label to the back of the quilt and then hand stitched the binding in place. 


I absolutely love how this turned out. It's a great mixture of a whimsy and structure - just like Megan herself. She is a very focus individual, a go-getter but does everything with heart and sense of humor. I love her and can't wait to meet this gorgeous little one!


Now here's all the photos of the finished Gracie's Herringbone baby quilt: 


Monday, July 7, 2014

Everly's Diamonds

 Your best friend only has her first baby once. Jolene is that perfect best friend, almost. Her only flaw is that she lives 2000 miles away. Jolene and I met years ago and instantly clicked. She's incredibly generous, supportive, full of love and has the best sense of humor in the world. She took a huge leap of faith and moved across the country to start a life with her now husband and wherever she goes, she sparkles and shines. 
The minute she told me she was having a baby, I immediately started daydreaming of ideas for her quilt. I had a design that was gender neutral but I just couldn't start. It wasn't until I was
driving and listening to that incredibly catching, albeit slightly annoying (and drug inspired) Diamonds by Rihanna when I read a text from Jolene. She was having a baby girl! 

Shine bright like a diamond, shine bright like a diamond in the sky..find light in the beautiful sea...

Jolene is a diamond; she's one of a kind, valuable and beautiful. And her baby girl would definitely be one in the same. So the quilt had to have a diamond pattern. She chose the colors for the nursery and I followed suit in my fabric selection. I used my Hex N More ruler to cut perfect diamonds of the four fabrics.

 So at this point I knew I wanted to put a lot of white in the design and added the 60 degree strips between the diamonds. The top measures about 50" x 65" 


After I got the quilt pieced I designed a quilt label in my Bernina embroidery V7 software and embroidered it. I really like this part of the quilt, this baby thing was starting to feel real! 


I loaded the quilt on my Handi Quilter and used the Pro-Stitcher to do an all-over quilting with the "orange peel" pattern. I liked the vast difference between the sharpness of the diamonds and the curves of the quilting. I used white thread on the top and back to blend and let the diamonds shine.  

After quilting, I attached the label to the back on the diagonal, with a hand stitch. 


Here's the label on the diagonal on the back. You only have to hand sew one side!
With the wide white borders I liked the idea of doing a white binding so that the diamonds would really pop. The rational part of my brain kicked in and I decided to use the coral polka dot instead. White bindings are so beautiful but tend to look dirty after a few touches.
 I love a hand stitched binding and was happy with how this beauty turned out. Once the binding was done, it was time for an outdoor photo shoot for Baby Everly's
Shine Bright like a Diamond quilt. 


 Sometimes people ask why I quilt. (or for that matter, why does anyone quilt?) We don't need the quilts. We do it because we love it. We love pretty things. We love our friends and family. We want to see someone smile. We want to show our appreciation. We want to express feelings that have no words. 

I'll never be able to match the amazing-ness of Jolene, and I won't get to hold the baby very often, but at least she'll have a quilt that will always remind her of how much I love her and how much she means to me.

Shine bright like a diamond... 


Wednesday, July 2, 2014

3D Pinwheels


3D Pinwheels are a fun, eye catching quilt block that give your project dimension and a little fun flair! 


You can make this in any size, you will just simply need to cut everything to the same size. For a finished 12" block, pictured above I started with 16 = 3" squares


For the pinwheel portion of the block, take 4 of your squares and iron them individually in half diagonally. 


Then fold again on the diagonal and iron a second time.


Grab two background squares and lay two of your pinwheels down as show below. Sandwich the pinwheels between your two background pieces and stitch using a 1/4" seam allowance. (do two of these for a complete block)


Open up the seam after you sew it and press the pinwheels into the position.


Put your two pieces of pinwheels together, matching your center seam and stitch. 


Press seams on direction on the backside. For a flatter center, press the center joint open like you see below. 


Keep making your pinwheels until you get enough for your project!
This block below is a larger version, starting with 6" squares and a button for the center for a fun accent! 

Hexies by Machine

I see hexagons all over blogs, Instagram and Pinterest. Most people are stitching them by hand using a method called English Paper Piecing. I love the look of it, but frankly I have too many things I want to create to spend the time! I can also achieve the exact same look by machine! And here's how.

First you will need to cut your hexagons or "hexies" as they are affectionately called. There are templates and rulers available or even make your own using freezer paper and some math skills! 

I'm lucky enough to have an Accuquilt Go! fabric die cutting machine. I can cut up to eight layers of fabric with this baby in the matter of seconds, in various sizes! 


After you have cut your hexies, grab a ruler and mark a dot, on the wrong side of each corner of your hexie at 1/4" in from the point. (Once you get the hang of it, this step might be omitted, but do it for your first few) Make sure you are using a 1/4" presser foot for a perfect seam allowance!


Place two hexies right-sides together and stitch from dot to dot on one side. Open and press. 
Add your third hexagon as you see below. You will now be stitching what is called a "Y-Seam"


You will stitch the Y-Seam one side at a time. It doesn't matter which one. Lay your third hexagon (blue in picture) right sides together on orange fabric. Maneuver the green material out of the way at the corner so that you don't stitch through it. And sew from dot to dot. Open seam up and then match the side to the other part of your Y-Seam.  Stitch from dot to dot. 


Open and press! You should have something that looks like this!


Keep adding your hexies in a circular manner. 


Now admire your work! And how efficient you are!